
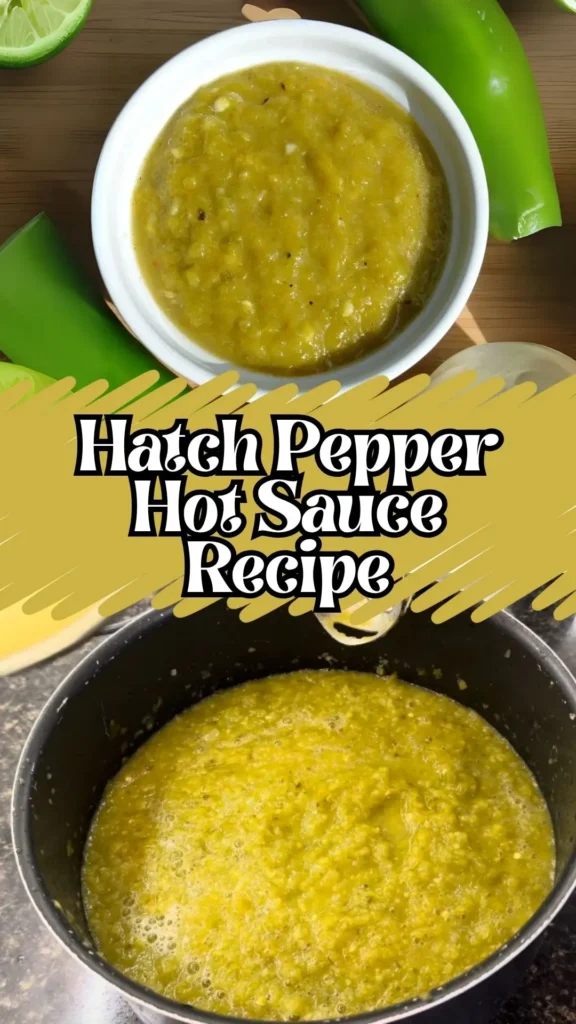
If you’ve ever grown Hatch chilies at home or snagged some from a local market, you’re in for a treat. Today, we’re making a deeply flavorful, mildly spicy Hatch Pepper Hot Sauce Recipe-fermented to bring out its boldest, most delicious notes.
This recipe combines fresh and frozen Hatch chilies with fiery jalapeños, garlic, and onion, then ferments low and slow for three months to build irresistible tang and depth. Fermentation might sound complicated, but this method is easy and low-maintenance.
With just a few ingredients and some patience, you’ll have a hot sauce that’s as satisfying to make as it is to eat. So, grab your fermentation jar-it’s time to bottle some green gold!
Why You Will Love This Hatch Pepper Hot Sauce
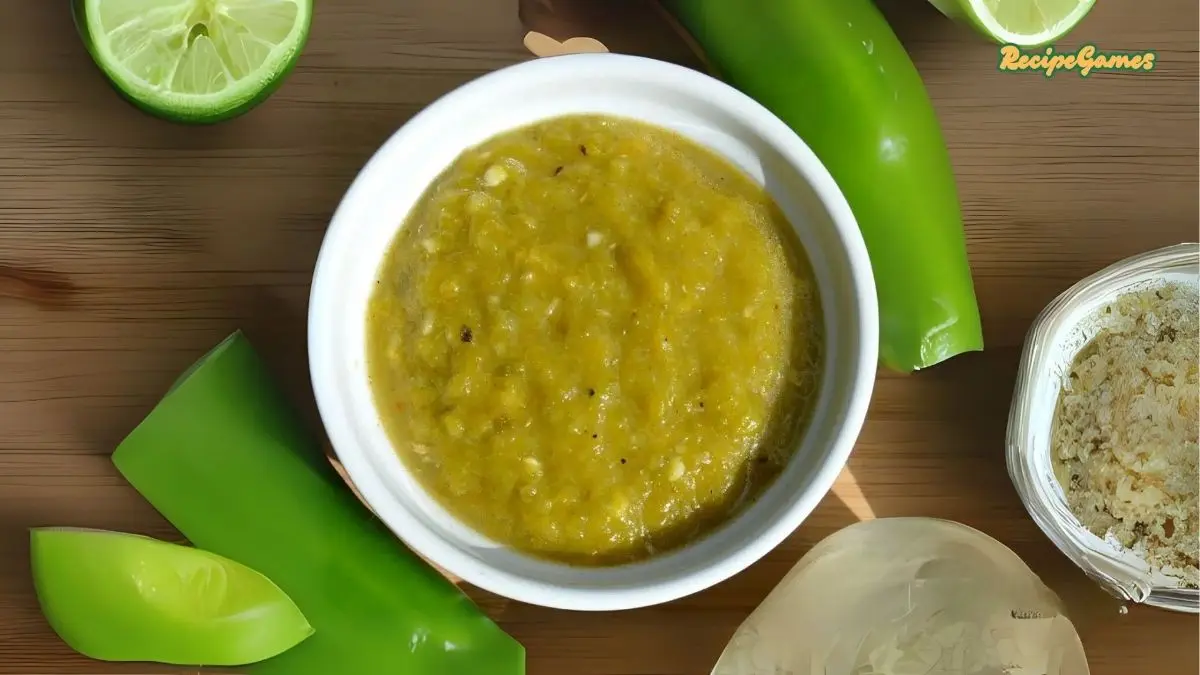
The first thing you’ll notice is the bright, tangy aroma-thanks to the natural fermentation process. The combination of Hatch peppers, onions, garlic, and jalapeños creates a complex flavor that’s both earthy and slightly sweet, with just the right touch of acidity.
This hot sauce isn’t scorching-it’s mild to medium in heat, depending on how spicy your jalapeños are. But what it lacks in fire, it makes up for in richness. You get that roasted green chili depth with a zingy, savory bite.
The texture is smooth with a bit of pulp for body, perfect for everything from tacos to marinades or even a few dashes on your morning eggs.
Ingredients Used in This Hatch Pepper Hot Sauce Recipe
- 30 Hatch chilies (mix of fresh and frozen)
- 30 jalapeños (mix of fresh and frozen)
- 2 white onions
- 1 whole head of garlic
- Pink Himalayan salt (or non-iodized sea salt)
- Filtered water (to create a 3% brine)
- ½ cup of brine (for blending)
- ½ cup distilled white vinegar
Essential Kitchen Equipment Required
- 1-gallon glass fermentation jar with airlock lid
- Slotted spoon
- Stick blender (or countertop blender)
- Fine mesh strainer
- Funnel and ladle
- Clean glass hot sauce bottles with droppers and caps
- Saucepan (for pasteurization)
Prep Time: 30 minutes
Fermentation Time: 3 months
Blending & Bottling Time: 45 minutes
Yield: Approximately 4–5 cups of hot sauce
How To Make Hatch Pepper Hot Sauce
Step 1: Prep the Ingredients
Roughly chop the Hatch chilies and jalapeños. Toss them into a clean 1-gallon fermentation jar along with the chopped onions and peeled garlic cloves.
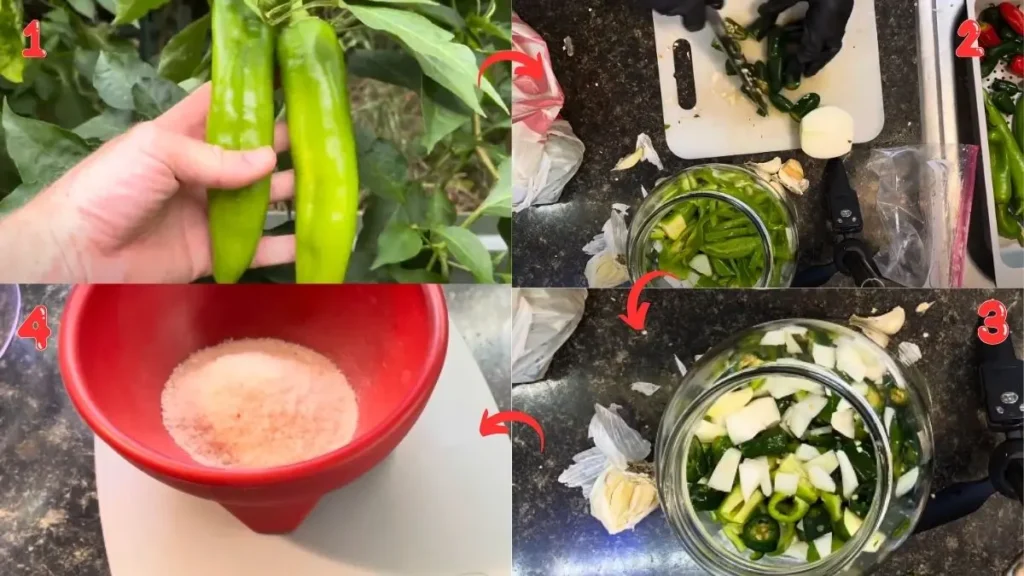
Step 2: Add the Brine
Make a 3% brine using non-iodized salt (like pink Himalayan). Pour the brine over the ingredients until fully submerged. Use a brine-filled baggie as a weight to keep everything below the surface for anaerobic fermentation.
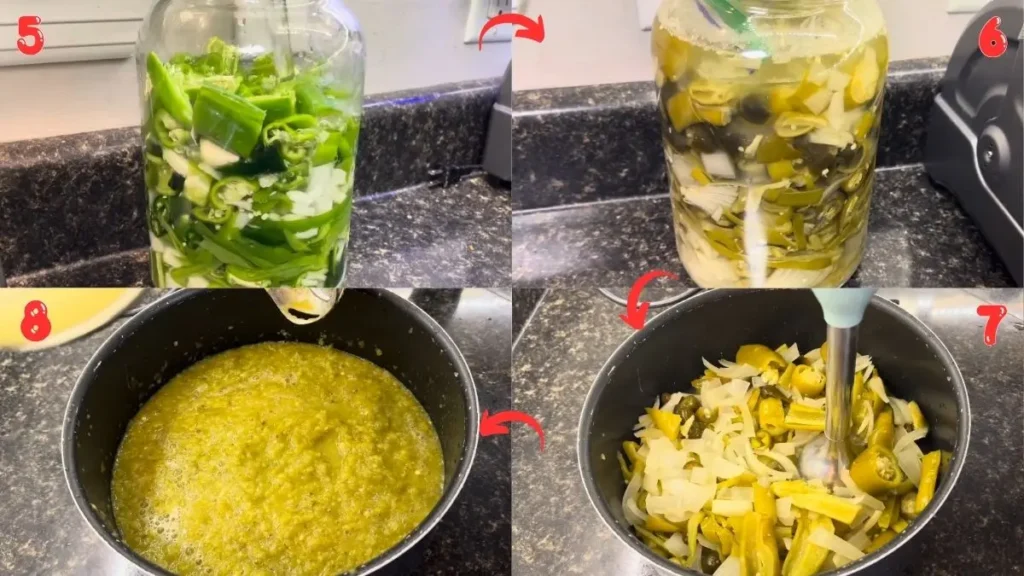
Step 3: Ferment
Seal the jar with an airlock lid and place it in a dark cabinet. Let it ferment for 3 months. Expect the colors to deepen, textures to soften, and a tangy aroma to develop.
Step 4: Blend the Sauce
After 3 months, remove the vegetables with a slotted spoon and add them to a pot or blender. Add about 2 cups of the brine and blend until smooth. Optionally, add vinegar for acidity and thin the consistency. Taste and adjust with more brine or vinegar as needed.
Step 5: Strain for Texture
If the sauce is too thick, strain half or more through a fine mesh strainer. This helps create a smooth, pourable texture perfect for dropper bottles.
Step 6: Pasteurize and Bottle
Pasteurize the sauce on the stove for 10–15 minutes. Ladle it into sanitized bottles using a funnel. Cap with droppers and apply shrink tops if gifting. Use the hot-fill flip method for safe sealing.
Notable Tips to Make This Hatch Pepper Hot Sauce Recipe Perfect
Here are some notable tips, that can help you to make this recipe perfect in the very first attempt. Check below
1. Wash your peppers first.
Make sure the Hatch chilies and jalapeños are nice and clean before you start.
2. You can use frozen peppers.
It’s okay to mix frozen and fresh peppers. Just make sure you use a few fresh ones too!
3. Chop everything big.
No need to cut small-big pieces are just fine for the jar.
4. Use clean jars.
Wash your jar really well before putting in your peppers.
5. Don’t use table salt.
Use pink salt or sea salt, not the kind with iodine. That can hurt the ferment.
6. Keep the veggies under the water.
Push everything down with a bag of brine to stop air from getting in.
7. Be patient!
Let it sit for 3 months. That’s how it gets yummy and tangy.
8. Taste and change.
Try the sauce before bottling. You can add more salt or vinegar if you like.
9. Blend it smooth.
Use a stick blender or regular blender to make it smooth and tasty.
10. Save the pulp!
Dry the leftover pulp and turn it into spicy flakes. Nothing gets wasted!
Some Delicious Ways to Pair and Enjoy This Hatch Pepper Hot Sauce
Whether it’s a party, family function or you are enjoying this Hatch Pepper Hot Sauce at your home, the following serving ideas can make your meal more comfortable and delicious to enjoy.
1. Drizzled on Breakfast Tacos
We’ve been topping our scrambled egg and potato breakfast tacos with this Hatch hot sauce almost daily. It brings just the right amount of tang and heat to wake up your morning without overpowering the flavors.
2. Stirred into Guacamole
A few spoonfuls mixed into fresh guac gives it a whole new dimension. That fermented chili kick mixed with creamy avocado? It disappears fast at every get-together we bring it to.
3. Tossed with Grilled Shrimp
We love brushing this sauce onto grilled shrimp right after pulling them off the grill. It clings beautifully and adds a smoky, garlicky punch that tastes like summer in every bite.
4. Mixed into Creamy Dips
We tried stirring a few teaspoons into sour cream and mayo for a quick dipping sauce-amazing with roasted potatoes or even sweet potato fries. It’s creamy, spicy, and tangy all at once.
5. Poured Over Roasted Vegetables
Roasted Brussels sprouts, cauliflower, or Yard House Edamame with a drizzle of this hot sauce is one of our go-to sides now. That extra layer of acidity and spice makes veggies taste so much better.
6. Added to Mac & Cheese
We stirred some into a pot of stovetop mac and cheese the other day-and wow. The balance of the tangy chilies and the creamy cheese is seriously addictive. Try it with sharp cheddar.
7. On Fried or Scrambled Eggs
Simple, but a classic. Just a few drops over a plate of soft scrambled eggs or on a crispy fried egg adds a fermented chili flavor that makes breakfast feel fancy.
8. Swirled into Ramen or Brothy Soups
We’ve been adding a spoonful into ramen bowls and chicken soup. It perks up the broth instantly and gives it that “been-simmering-all-day” flavor, even when you’re working with leftovers.
9. With Grilled Meats or BBQ
Brush this sauce onto grilled chicken, pork chops, or even ribs toward the end of cooking. We’ve done this at our last barbecue and everyone kept asking for the “green sauce recipe.”
10. As a Pizza Finishing Sauce
We like to lightly drizzle it over veggie or sausage pizza right before serving. It cuts through the richness of the cheese and adds a gourmet twist that’ll have you skipping the red pepper flakes.
How to Store Hatch Pepper Hot Sauce Properly
Store your hot sauce in the refrigerator for up to 6 months. Since it’s fermented and pasteurized, it’s shelf-stable for a while-but cold storage preserves the flavor. No reheating needed-just shake before each use!
Hatch Pepper Hot Sauce Recipe
Ingredients
Method
- Roughly chop the Hatch chilies and jalapeños. Toss them into a clean 1-gallon fermentation jar along with the chopped onions and peeled garlic cloves.
- Make a 3% brine using non-iodized salt (like pink Himalayan). Pour the brine over the ingredients until fully submerged. Use a brine-filled baggie as a weight to keep everything below the surface for anaerobic fermentation.
- Seal the jar with an airlock lid and place it in a dark cabinet. Let it ferment for 3 months. Expect the colors to deepen, textures to soften, and a tangy aroma to develop.
- After 3 months, remove the vegetables with a slotted spoon and add them to a pot or blender. Add about 2 cups of the brine and blend until smooth. Optionally, add vinegar for acidity and thin the consistency. Taste and adjust with more brine or vinegar as needed.
- If the sauce is too thick, strain half or more through a fine mesh strainer. This helps create a smooth, pourable texture perfect for dropper bottles.
- Pasteurize the sauce on the stove for 10–15 minutes. Ladle it into sanitized bottles using a funnel. Cap with droppers and apply shrink tops if gifting. Use the hot-fill flip method for safe sealing.
Video
Notes
FAQs on This Hatch Pepper Hot Sauce Recipe
Here, we’ve got you covered with some common questions about the Hatch Pepper Hot Sauce that people often ask.
1. Is a Hatch pepper hotter than a jalapeño pepper?
From our experience, Hatch peppers are typically milder than jalapeños. Most Hatch varieties sit between 1,000–2,500 Scoville units, while jalapeños range from 2,500–8,000. However, some Hatch types-especially the Sandia variety-can get spicier. In this recipe, we added jalapeños to increase the heat level a bit.
2. What can I make with Hatch peppers?
Honestly, Hatch peppers are incredibly versatile. Aside from hot sauce, we’ve roasted them for enchiladas, blended them into salsas, tossed them into stews, and even added them to burgers. Their smoky, earthy flavor makes them perfect for grilling and fermenting alike.
3. How spicy is a Hatch pepper?
Hatch peppers have a gentle heat that builds slowly. Most are on the mild side, but depending on the variety and growing conditions, they can surprise you. In our batch, they were super flavorful with just a soft kick, which paired beautifully with the sharper heat of the jalapeños.
4. Can I ferment frozen peppers?
Yes! We’ve done it many times. In fact, this recipe used a mix of frozen and fresh Hatch chilies and jalapeños. The key is to always include some fresh peppers in the mix to kickstart the fermentation with live bacteria.
5. What’s the white stuff on top of my ferment-mold or yeast?
If it’s white and powdery, it’s usually harmless yeast (Kahm yeast)-not mold. We saw this in our 3-month ferment, and it’s completely normal. Mold tends to be fuzzy and colored (like blue or black). Yeast, on the other hand, forms as a white film and is safe to skim off.
6. Can I shorten the fermentation time?
Technically, yes-you can ferment for just a couple of weeks and still get some flavor. But from our experience, a full 2 to 3 months really deepens the flavor, adding that delicious funk and tang you just can’t rush.
7. Do I need a fermentation jar with an airlock?
We definitely recommend it. In our ferment, the airlock helped release gas without letting air or contaminants in, which is crucial for a clean anaerobic environment. It’s a small investment that makes a big difference in the result.
8. Why use pink Himalayan salt or sea salt?
From our testing, iodized salt tends to interfere with fermentation, sometimes slowing it down or stopping it completely. Non-iodized options like Himalayan or sea salt work best-they help the beneficial bacteria thrive without additives getting in the way.
9. How long does homemade hot sauce last?
If pasteurized and stored properly in sterilized bottles, our batches have lasted up to 6 months in the fridge. The vinegar, salt, and fermentation all help preserve it naturally. We’ve even gifted bottles months later with no issues.
10. Can I use the leftover pulp from straining the hot sauce?
Absolutely-and we always do! We dehydrate the leftover pulp and turn it into homemade chili seasoning flakes. It’s a fantastic way to reduce waste and keep enjoying the flavor of your ferment in dry form.
If you’re looking for a hot sauce that’s bold in flavor but easy on the heat, this Hatch pepper hot sauce recipe is the one to try. The three-month ferment unlocks incredible depth, and the balance of garlic, onion, and jalapeño is simply next level.
Try this recipe, and don’t forget to share it with fellow hot sauce lovers. Want more fermenting adventures? Subscribe and check back for more spicy creations!
Drop a comment on the blog with your feedback-I can’t wait to hear what you think.
Also, follow along on Pinterest and Reddit for more tasty updates. Your support and thoughts mean the world!
Tried this today and couldn’t be happier with the results. It’s flavorful, simple, and a recipe I’ll keep forever bookmarked.