
If you love pizza (and I mean really love pizza), then you have to try this Vito Iacopelli Dough Recipe. I’m not kidding. This is the dough that takes your pizza from “okay” to “OH WOW!” It’s soft, it’s fluffy, and it’s just a little bit crispy in all the right spots. This dough is like a warm, doughy balloon. And yes – that’s a good thing!
Now, this recipe comes from Vito Iacopelli. If you don’t know him, oh boy, you’re in for a treat. He’s kind of a pizza master – like a real one. He shares all his secrets, and guess what? They’re actually easy to follow. You don’t need to be a pro chef. You just need a bowl, some flour, and a little time.
So let’s not wait. Let’s get in the kitchen, roll up our sleeves, and make the best Vito Iacopelli Poolish Pizza Dough ever. Are you ready? Because once you make this, there’s no going back. Let’s do it together!
Why You Will Love This Vito Iacopelli Dough?
You’re gonna love this dough. I mean really love it. It’s soft, it’s airy, and it gets that perfect little crunch on the outside. It feels like magic in your hands!

This dough is easy to make, even if it looks fancy. You just follow Vito’s steps, and boom – you’ve got something amazing. You don’t need to be a chef. Just mix, wait, and smile.
And oh, the taste! It’s light, a little chewy, and full of flavor. When it bakes, it puffs up like a balloon. Everyone will say, “Wow!” It’s fun, it’s tasty, and it’s something you’ll wanna make again and again.
Ingredients Used in This Vito Iacopelli Dough Recipe
For the Poolish (pre-ferment):
- 300g water (room temp)
- 5g honey
- 6g fresh yeast (or 5g dry yeast)
- 300g “00” flour
For the Final Dough:
- Poolish (from above)
- 400g water
- 700g “00” flour (or any good flour you can find)
- 25g sea salt
- 10g olive oil
Essential Kitchen Equipment Required
- Large mixing bowl (wooden preferred)
- Measuring scale (grams are a must!)
- Dough spatula or scraper
- Plastic container or dough tray
- Clean kitchen towel or plastic wrap
- Pizza stone or baking steel
- Oven (max temp, preferably with convection)
- Pizza peel (optional but helpful)
Prep Time: 30 minutes (active)
Fermentation Time: 16–24 hours (cold ferment)
Resting Time: 2–3 hours (before use)
Cook Time: 7–10 minutes (in hot oven)
Yield: 4 dough balls (approx. 250g each – 12-inch pizzas)
How To Make Vito Iacopelli Dough Copycat
1. Make the Poolish
In a bowl, mix: 300g water, 5g honey, 6g fresh yeast (or 5g dry yeast), Stir to dissolve, then add 300g of “00” flour. Mix until smooth, cover, and let rest 1 hour at room temperature, then refrigerate for 16–24 hours. This is where flavor begins.
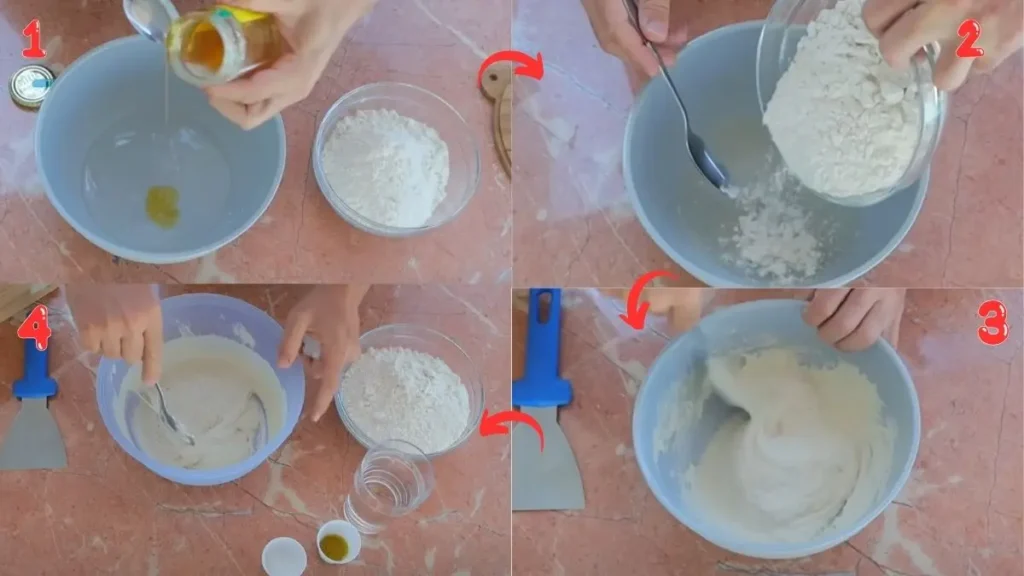
2. Mix the Dough
Remove poolish from fridge and let it sit 30 minutes at room temperature. Then: Add 400g water to the poolish and mix to loosen it. Add 700g flour and 25g salt – mix everything together by hand or in a dough mixer.
Add 10g olive oil last and knead until smooth (10–15 mins by hand or 8–10 mins in mixer). Shape into a ball and rest for 15–20 minutes.
3. First Fermentation
After resting, fold the dough a few times to strengthen it. Lightly oil a container or bowl, place the dough inside, and cover tightly. Refrigerate for another 16–24 hours for cold fermentation.
4. Dough Balling
Take dough out of the fridge, let sit 30–60 minutes. Divide into 250g portions for 12-inch pizzas. Form each into a tight ball – close the seam and place seam-side down in a floured dough tray or container. Let rise at room temperature for 1–2 hours, until fully proofed and airy.
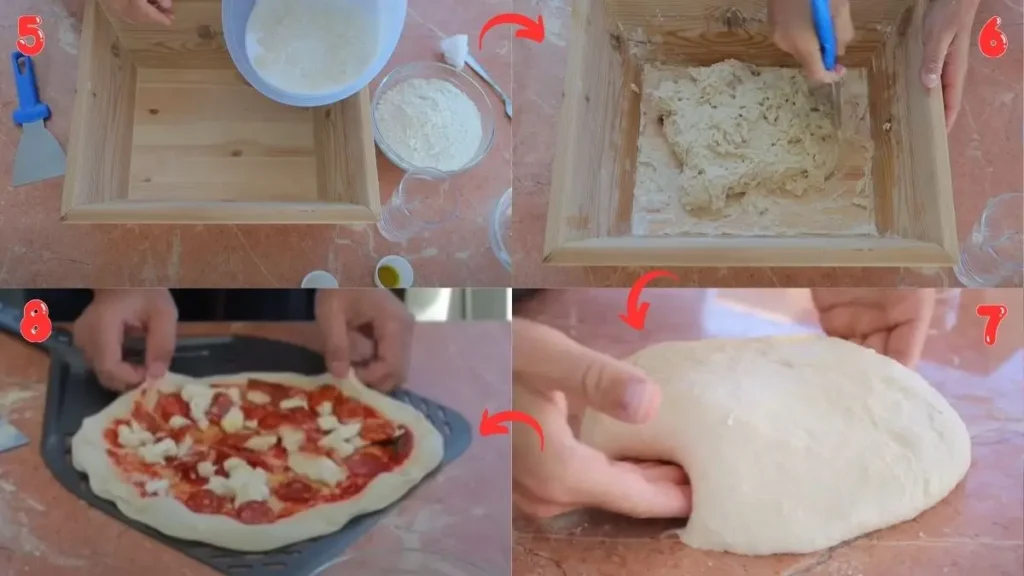
5. Bake That Pizza!
Preheat your oven to the max (with stone inside) for 1 hour. Use semolina flour to help stretch the dough – gently press, stretch, and shape into a pizza base. Add sauce, cheese, toppings – whatever you love. Bake for 7–10 minutes until bubbly, golden, and crisp!
Notable Tips to Make This Vito Iacopelli Dough Recipe Perfect
Here are some notable tips, that can help you to make this recipe perfect in the very first attempt. Check below
1. Use a big bowl.
It helps when you mix! If the bowl is wood, even better. But any bowl will work.
2. Don’t rush the rest.
Let the dough rest in the fridge for 16 to 24 hours. This makes it taste really good.
3. Warm it up a little.
After you take the dough out of the fridge, wait 30 minutes. That helps it wake up!
4. Use a scale.
Try to weigh your flour and water. This way, the dough will be just right.
5. Mix slow and steady.
When you mix, take your time. Don’t rush. Let the dough come together soft and smooth.
6. Oil your hands.
A little olive oil on your hands stops the dough from sticking. It also helps the dough feel nice.
7. Don’t add too much flour.
When you stretch the dough, just a tiny bit of flour is enough. Too much flour makes it dry.
8. Keep the air in.
When you make the dough balls, try not to press too hard. You want to keep the air bubbles inside. That makes the pizza puffy and light!
9. Heat the oven a lot.
Turn the oven on high. Let it heat for one full hour with a stone inside. Hot oven = yummy crust.
10. Have fun and don’t worry!
If it’s not perfect the first time, it’s okay! Pizza is fun to make and better every time you try.
Some Delicious Ways to Enjoy This Vito Iacopelli Dough
Whether it’s a party, family function or you are enjoying this Vito Iacopelli Dough at your home, the following serving ideas can make your meal more comfortable and delicious to enjoy.
1. Classic Margherita – Straight from the Heart
Let’s start where it all began. Nothing beats a simple Margherita with San Marzano tomato sauce, fresh mozzarella, and basil from your windowsill. Drizzle of olive oil right before the bake. We’ve made this a hundred times, and every time it hits like the first.
2. Spicy Salami & Hot Honey – The Crowd Pleaser
This combo is addictive. Layer on spicy salami (or “pepperoni” if you’re in the U.S.), then finish with a little hot honey drizzle after baking. Trust us – sweet, spicy, salty – it’s a flavor bomb. We served this last game night, and not a slice was left.
3. Prosciutto & Arugula – For When You’re Feeling Fancy
After baking your base with just cheese, top it off with prosciutto, fresh arugula, and shaved Parm. A splash of lemon juice or balsamic glaze? Chef’s kiss. We made this one for date night and felt like we were eating at a sidewalk café in Italy.
4. Four Cheese White Pizza – The Comfort Pie
Mozzarella, gorgonzola, fontina, and a touch of parm. No sauce, just pure melty goodness. It’s rich and cozy, and every bite wraps you up like a warm blanket. This is our go-to for movie nights with a glass of white wine.
5. BBQ Chicken Pizza – The American Twist
Start with BBQ sauce as your base, then add shredded rotisserie chicken, mozzarella, and red onion slices. After baking, sprinkle on chopped cilantro. It’s smoky, sweet, and honestly… one of our guilty pleasures on a weekend.
6. Breakfast Pizza – Yes, It Works
You haven’t lived until you’ve cracked an egg right in the middle of a pizza. We do this with bacon or pancetta, some sautéed spinach, and cheese. Bake until the egg is just set. Sunday brunch never looked (or tasted) this good.
7. Truffle Mushroom Pizza – When You Want to Impress
We did this one for a dinner party once. White sauce base, sautéed mushrooms (shiitake, cremini, or whatever’s fresh), mozzarella, and a light drizzle of truffle oil. It disappeared in five minutes.
8. Sweet & Savory Fig Pizza – Dessert or Dinner? Both.
A little fig jam as the base, then top with goat cheese, caramelized onions, and prosciutto. Bake and finish with arugula or walnuts. We were skeptical the first time, but now it’s one of our most requested combos.
9. Buffalo Mozzarella & Cherry Tomatoes – The Fresh Take
Think of this as your pizza caprese. Fresh cherry tomatoes, buffalo mozzarella, a drizzle of olive oil, and finish with fresh basil after baking. We eat this one cold sometimes – it’s that refreshing.
10. Nutella Dessert Pizza – The Sweet Ending
You gotta save some dough for dessert. Roll it thin, bake it plain, then spread with Nutella, top with strawberries or bananas, and dust with powdered sugar. It’s fun, it’s indulgent, and yes – we’ve definitely eaten this one for breakfast too.
How to Store and Reheat This Vito Iacopelli Dough Properly
You can keep leftover dough balls:
In the fridge for up to 2 days (airtight container, lightly floured).
In the freezer for up to 2 months (wrap in plastic + zip bag). Thaw in fridge overnight and let rest at room temp 2–3 hours before use.

Vito Iacopelli Dough Recipe
Ingredients
Method
- In a bowl, mix: 300g water, 5g honey, 6g fresh yeast (or 5g dry yeast), Stir to dissolve, then add 300g of “00” flour. Mix until smooth, cover, and let rest 1 hour at room temperature, then refrigerate for 16–24 hours. This is where flavor begins.
- Remove poolish from fridge and let it sit 30 minutes at room temperature. Then: Add 400g water to the poolish and mix to loosen it. Add 700g flour and 25g salt – mix everything together by hand or in a dough mixer. Add 10g olive oil last and knead until smooth (10–15 mins by hand or 8–10 mins in mixer). Shape into a ball and rest for 15–20 minutes.
- After resting, fold the dough a few times to strengthen it. Lightly oil a container or bowl, place the dough inside, and cover tightly. Refrigerate for another 16–24 hours for cold fermentation.
- Take dough out of the fridge, let sit 30–60 minutes. Divide into 250g portions for 12-inch pizzas. Form each into a tight ball – close the seam and place seam-side down in a floured dough tray or container. Let rise at room temperature for 1–2 hours, until fully proofed and airy.
- Preheat your oven to the max (with stone inside) for 1 hour. Use semolina flour to help stretch the dough – gently press, stretch, and shape into a pizza base. Add sauce, cheese, toppings – whatever you love. Bake for 7–10 minutes until bubbly, golden, and crisp!
Video
Notes
FAQs on This Vito Iacopelli Dough Recipe
Here, we’ve got you covered with some common questions about the Vito Iacopelli Dough Recipe that people often ask.
1. What flour does Vito Iacopelli use?
From watching Vito for years, we can tell you-he swears by “00” flour. It’s finely milled, super soft, and perfect for high-hydration doughs like this one. It gives the dough that signature silky texture and light chew. But hey, if you can’t find “00” in your local store, a good all-purpose flour will still get you great results.
2. What are the 4 ingredients in pizza dough?
At its core, pizza dough is as simple as it gets: flour, water, yeast, and salt. That’s it. But Vito takes it a step further by adding a touch of honey and olive oil to boost flavor and fermentation. Trust us, it makes a difference!
3. What is the 55 rule for pizza dough?
So, the “55 Rule” is a bit of a misunderstood concept. It often refers to the ideal dough temperature (around 55°F / 13°C) after mixing, which helps control fermentation. In our experience making Vito’s dough, the key is not just temperature, but patience-letting the dough ferment slowly in the fridge gives you that light, airy texture.
4. How to make perfect Italian pizza dough?
Follow Vito’s steps to the letter. Use a poolish (pre-ferment), give it time to rest, and use good quality ingredients. One thing we’ve learned from making this recipe over and over is: don’t rush it. Let the dough ferment at least 16 hours in the fridge, and handle it gently when forming the balls. That’s the secret to true Italian texture and flavor.
5. Why is my dough so sticky?
We’ve been there! The dough is 70% hydration, which means it’s supposed to be sticky at first. The trick is to keep working it until the gluten builds up-and avoid adding too much flour. Use a scraper and a bit of olive oil on your hands if needed. After 10–15 minutes of kneading, it gets nice and smooth.
6. Can I use dry yeast instead of fresh yeast?
Absolutely! We’ve done it many times. If a recipe calls for 6g fresh yeast, you can substitute it with 5g of active dry yeast. Just make sure to dissolve it well in water before mixing. The dough will rise beautifully either way.
7. Can I freeze the Vito Iacopelli Dough?
Yes, and we’ve done it with no problems. After the cold fermentation stage (right before balling or after balling), just wrap each dough ball in plastic and freeze. When you’re ready to use it, thaw it overnight in the fridge, then let it come to room temperature for about 2–3 hours before baking.
8. What happens if I don’t let the Vito Iacopelli Dough rest long enough?
In our experience, cutting fermentation short leads to flat, flavorless pizza. The long, slow rise in the fridge is where the magic happens-air pockets form, gluten develops, and the dough becomes full of life. If you’re short on time, try a 6-8 hour room-temp rise, but honestly… overnight in the fridge is worth it.
9. How do I know the dough is ready to use?
The dough should be soft, airy, and slightly jiggly, like a water balloon. When you press it gently with a fingertip, it should bounce back slowly. We always look for a smooth surface and strong structure-that’s when you know it’s time to shape your pizza.
10. What’s the best way to stretch the dough without tearing it?
This took us a while to learn, but the key is to use your fingertips-not a rolling pin-and work from the center out. We sprinkle a little semolina or flour on the counter, press gently, and let the dough stretch naturally. The air stays in the crust, and you get that beautiful puffy cornicione (edge).
And that’s it – Vito Iacopelli’s secret pizza dough, now yours. This isn’t just a dough recipe; it’s a love letter to real pizza. If you follow the steps, you’ll be biting into the kind of pizza dreams are made of – airy, crispy, soft, and full of flavor.
Try it once and you’ll never go back. Oh, and don’t forget: great pizza starts with great dough. Buon appetito, and remember to share this recipe with your fellow pizza lovers!
Drop a comment on the blog with your feedback-I can’t wait to hear what you think.
Also, follow along on Pinterest and Reddit for more tasty updates. Your support and thoughts mean the world!
My family loved this recipe so much! It was easy to prepare and tasted like something we’d order from a restaurant.