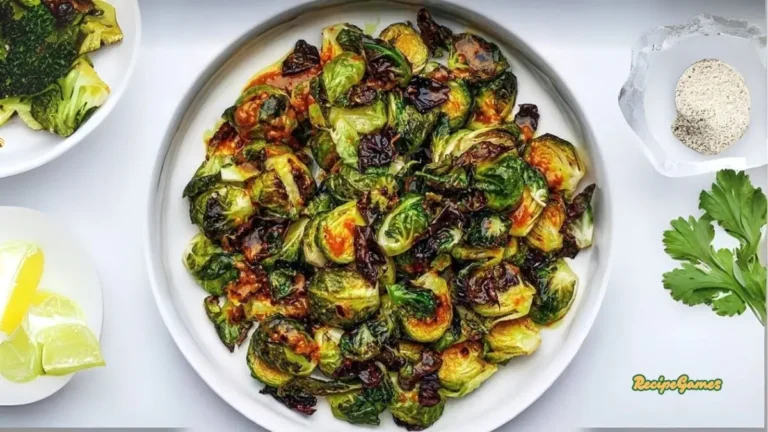
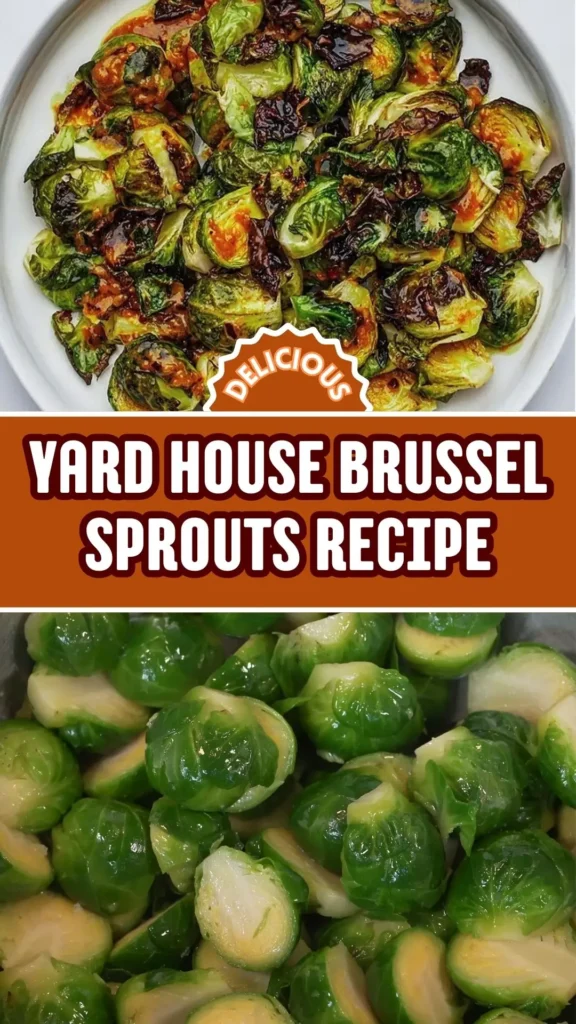
I promise you-if you try this Yard House Brussel Sprouts Recipe just once, there’s no going back. These sprouts are next-level delicious. I’m talking crispy edges, golden centers, and flavor that’ll knock your socks off.
No time to waste-let’s go! But hey, before we dive in, let me drop a hot tip. A common mistake I see is folks chopping off too much of the bottom of their sprouts. Don’t do that. I learned the hard way from a very passionate (and loud) Italian chef.
Just trim the tiniest bit, or they’ll fall apart like an onion with no root. And trust me, you don’t want your sprouts falling to pieces.
Why You Will Love This Yard House Brussel Sprouts?
These Brussels sprouts are the perfect balance of crispy, golden, and tender. Blanched just right, then roasted to perfection, they deliver restaurant-quality flavor with simple ingredients. The olive oil and salt bring out their natural nuttiness, while the caramelized edges add an irresistible crunch.
This recipe is easy, fast, and flexible-dress them up with bacon, nuts, or a maple glaze, or enjoy them in their pure, savory glory. Whether you’re cooking for a holiday feast or a weeknight dinner, this dish steals the spotlight. One bite and you’ll see-these aren’t your average sprouts. They’re unforgettable.
Ingredients Used in This Yard House Brussel Sprouts Recipe
- 4 lb fresh Brussels sprouts
- 1 ½ tablespoons kosher salt (plus extra for seasoning)
- Olive oil (about 4–5 tablespoons total)
- 1 tablespoon garlic powder
- 1 tablespoon paprika
- 1 teaspoon black pepper
Essential Kitchen Equipment Required
- Large pot
- Strainer or colander
- Mixing bowl
- Sharp knife and cutting board
- Baking sheet (or two, if you’re doubling up)
- Oven with convection fan (optional but ideal)
Prep Time: 10 minutes
Cook Time: 35 minutes
Yield: Serves 4 as a side
Copycat Yard House Brussel Sprouts Recipe
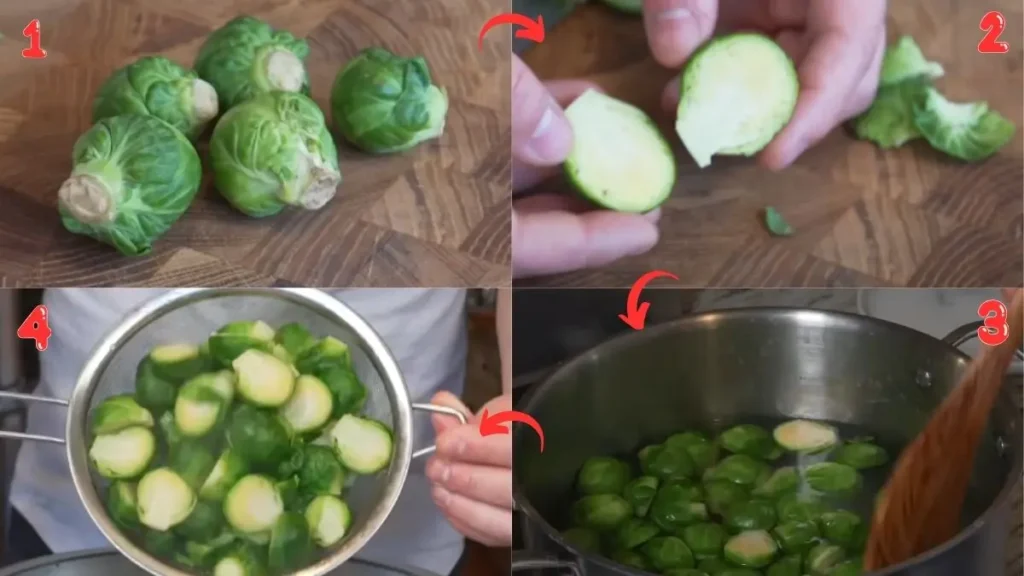
1. Trim the sprouts just right
Take your Brussels sprouts and trim only a tiny bit off the bottom. Too much and they’ll fall apart! Then slice each one in half.
2. Blanch those babies
Bring a big pot of water to a boil. Add 1 ½ tablespoons of kosher salt. Carefully drop in your sprouts. Boil for 6–7 minutes, then strain and let them steam off for 2 minutes.
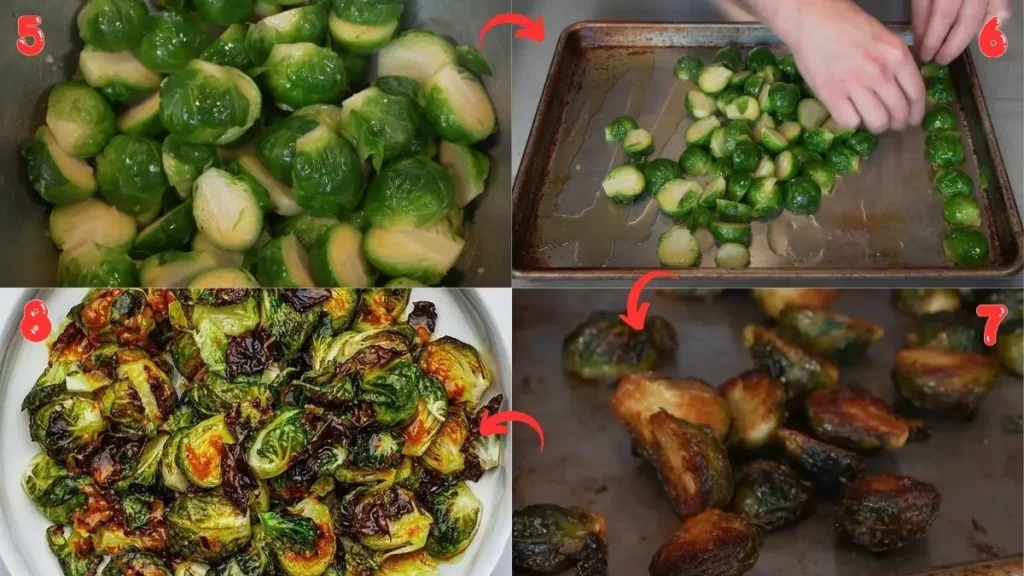
3. Olive oil love
Transfer them to a bowl and drizzle in a light touch of olive oil. Toss gently. Add a small sprinkle of kosher salt-this one’s just for the exterior.
4. Roast ’em to glory
Preheat your oven to 400°F (convection fan on if you’ve got it).
On a sheet pan, pour more olive oil generously-don’t be shy. Place sprouts cut side down, spaced at least a half inch apart. If needed, use a second pan.
5. Bake to golden perfection
Roast for 25–30 minutes until the backs are crispy and slightly charred. That means the inside is beautifully golden brown and packed with flavor.
6. Upgrade if you want
Want to go fancy? Add bacon, nuts, or maple glaze. But honestly, these sprouts don’t even need it.
Notable Tips to Make This Yard House Brussel Sprouts Recipe Perfect
Here are some notable tips, that can help you to make this recipe perfect in the very first attempt. Check below
1. Just trim a little bit off the bottom
I used to cut off too much. Big mistake! The sprouts would fall apart in the water. Now I only snip a tiny piece-just enough to clean it up.
2. Cut them in half, not quarters
When I tried quarters, they cooked too fast and dried out. Halves are perfect. They stay tender inside and get crispy outside.
3. Use lots of boiling water
I always make sure the pot is big and the water is at a full boil. That helps the sprouts cook evenly and not get mushy.
4. Don’t skip the salt in the water
This one’s big. The salt in the boiling water gives the sprouts flavor on the inside. Trust me, they taste so much better this way.
5. Let them steam after blanching
When I strain them, I don’t touch them for a couple minutes. I just let them steam dry-it helps them get crispy later in the oven.
6. Toss gently with oil
I used to go wild with the spoon and break the sprouts. Now I use my hands or a big spoon and just coat them softly with oil.
7. Use plenty of olive oil on the pan
The oil on the baking sheet makes the bottoms super crispy and golden. I don’t skimp on this step-it’s a game changer!
8. Give them space on the pan
I used to cram them together, and they steamed instead of roasting. Now I space them out, and they get nice and brown.
9. Roast them cut side down
This part’s key. I always flip them so the flat side is down on the pan. That’s how you get that restaurant-style golden crunch.
10. Don’t be afraid of dark crispy edges
At first, I thought I’d burned them, but nope! A little black on the edges means deep flavor. That’s when they’re perfect.
Some Delicious Ways to Enjoy This Yard House Brussel Sprouts
Whether it’s a party, family function or you are enjoying this Yard House Brussel Sprouts at your home, the following serving ideas can make your meal more comfortable and delicious to enjoy.
1. With Yard House Poke Nachos
Okay, this one? Total flavor bomb combo. You’ve got the cold, spicy, creamy poke nachos… then boom-crispy, salty Brussels sprouts on the side. It’s like yin and yang. That crunch-on-crunch texture? Next level. We served this at a backyard hang and people were losing it.
2. Next to a Yard House Steak Bowl
The bold, juicy flavors in that steak bowl-paired with the roasted sprouts? Unreal. The sprouts cut through the richness with a bit of salty, crispy freshness. One time we even tossed the sprouts into the bowl for extra texture. Game-changer.
3. Starter before Yard House Edamame
Sounds simple, but hear us out: start with a small plate of these crispy sprouts, then roll into warm, sea-salted edamame. It’s a light, clean start that still brings major flavor. We did this once as a quick lunch lineup and felt like we were lowkey at Yard House itself.
4. With Garlic Aioli for Dipping
Yes, yes, yes. Whip up a quick garlic aioli and dip those crispy babies in. We’ve done this so many times when guests come over. You don’t even need a main dish-it’s just a vibe. And people go wild for it.
5. Tossed in a Warm Grain Bowl
Brown rice, farro, maybe a little roasted sweet potato, some feta, and those golden Brussels? Chef’s kiss. We’ve made this exact combo on busy weeknights, and it always hits. Plus, it’s super customizable.
6. Served Over Creamy Polenta
You want cozy comfort food? Do this. A bed of creamy polenta with crispy Brussels sprouts on top is next-level comfort. We add a drizzle of balsamic glaze, and every bite is like a warm hug. You’ll thank us later.
7. Sprinkled with Parmesan and Red Pepper Flakes
Ohhh yeah. One of our lazy Sunday tricks. Roast the sprouts, then hit them hot out of the oven with a shower of grated Parm and a pinch of red pepper flakes. Crunchy, cheesy, a little heat-it’s perfection.
8. Topped on a Flatbread or Pizza
Trust us: Brussels on pizza is totally underrated. We’ve layered them over a flatbread with mozzarella, caramelized onions, and goat cheese, and it was devoured. That crispy edge? Yes, please.
9. Alongside Grilled Chicken or Salmon
This is one of those go-to “what’s in the fridge” dinners we throw together all the time. Grilled protein + roasted sprouts a clean, balanced, delicious meal. Especially with a squeeze of lemon over the top. Fresh, light, and satisfying.
10. Drizzled with Maple and Crushed Pecans
Holiday vibes right here. We serve this every Thanksgiving, and it’s always a crowd favorite. A little maple syrup after roasting, plus some crushed toasted pecans for crunch. Sweet, salty, and straight-up addictive.
How to Store and Reheat This Yard House Brussel Sprouts Properly
Store them in an airtight container in the fridge for up to 3 days. To reheat, pop them back in the oven or air fryer for 5–7 minutes at 375°F so they crisp up again. Microwave? Meh-not the move for crispy magic.

Yard House Brussel Sprouts Recipe
Ingredients
Method
- Take your Brussels sprouts and trim only a tiny bit off the bottom. Too much and they’ll fall apart! Then slice each one in half.
- Bring a big pot of water to a boil. Add 1 ½ tablespoons of kosher salt. Carefully drop in your sprouts. Boil for 6–7 minutes, then strain and let them steam off for 2 minutes.
- Transfer them to a bowl and drizzle in a light touch of olive oil. Toss gently. Add a small sprinkle of kosher salt-this one’s just for the exterior.
- Preheat your oven to 400°F (convection fan on if you’ve got it).On a sheet pan, pour more olive oil generously-don’t be shy. Place sprouts cut side down, spaced at least a half inch apart. If needed, use a second pan.
- Roast for 25–30 minutes until the backs are crispy and slightly charred. That means the inside is beautifully golden brown and packed with flavor.
- Want to go fancy? Add bacon, nuts, or maple glaze. But honestly, these sprouts don’t even need it.
Video
Notes
FAQs on This Yard House Brussel Sprouts Recipe
Here, we’ve got you covered with some common questions about the Yard House Brussel Sprouts that people often ask.
1. How long do Brussels sprouts need to cook?
In our experience, blanching them for 6–7 minutes in salted boiling water is perfect. Then, roasting them for 25–30 minutes at 400°F gives that gorgeous crispy outside and tender center. Any longer and they get mushy-nobody wants that.
2. How long can you store Brussels sprouts (raw and cooked)?
Fresh raw Brussels sprouts can hang out in the fridge for about 7–10 days if you keep them dry and unwashed in a breathable bag. Once cooked (especially roasted like in this recipe), they’re best eaten fresh, but you can store leftovers in an airtight container for up to 3 days. Reheat in the oven or air fryer to bring back that crisp.
3. What conditions are best for growing Brussels sprouts?
We’ve grown them ourselves, and trust us, these little guys love cool weather. The best sprouts grow in rich soil with full sun exposure and temps between 45–75°F. They’re a slow grower-patience is key-but worth it!
4. Can I skip the blanching step?
You can, but we wouldn’t recommend it. Blanching seasons the inside and softens the sprouts slightly so they roast up perfectly-crisp outside, tender inside. It makes a big difference.
5. Do I have to use convection mode when roasting?
Nope, but if your oven has a convection setting, use it! It helps circulate hot air, which gives that next-level even browning. Without it, you might just need to roast them a couple minutes longer.
6. What’s the best way to reheat Brussels sprouts without losing the crisp?
Skip the microwave. Instead, reheat them in an oven or air fryer at 375°F for about 5–7 minutes. That’ll bring the crispy magic right back.
7. Why do my Brussels sprouts fall apart when I cut them?
Most likely, you’re trimming too much off the bottom. We’ve been there! Just shave a tiny bit off-enough to clean it up, but not so much that the leaves come loose.
8. Can I make these ahead of time?
Yes, you can blanch the sprouts ahead and keep them chilled. Then, just toss them in olive oil and roast when ready. Super helpful for holiday prep!
9. What can I add to make them even fancier?
Oh, we’ve experimented a lot. A drizzle of maple syrup, crumbled bacon, pancetta, toasted pecans, or even a balsamic glaze-any of these can take the flavor to a whole new level.
10. Can I use frozen Brussels sprouts for this recipe?
Technically yes, but fresh is 1000% better. Frozen sprouts release more moisture, so you won’t get that same crispy texture. If you must use frozen, thaw and dry them thoroughly first.
There you have it-the ultimate Yard House Brussels Sprouts Recipe. Crispy, simple, and ridiculously addictive. Master this technique, and you’ll never look at Brussels sprouts the same way again. Trust me-once you’ve had them this way, it’s over.
Drop a comment on the blog with your feedback-I can’t wait to hear what you think.
Also, follow along on Pinterest and Reddit for more tasty updates. Your support and thoughts mean the world!
This recipe is a keeper! Simple steps, budget-friendly, and the final dish tasted absolutely delicious. My family wants me to repeat it.